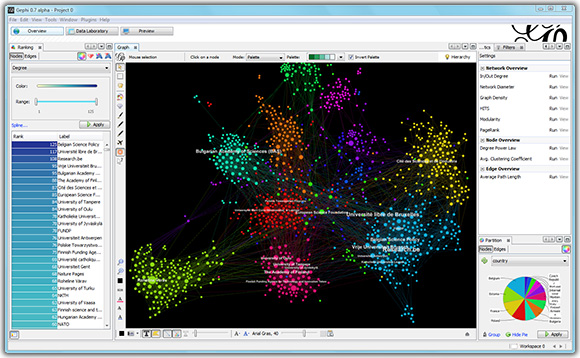
Running from Eclipse

From Gephi:Wiki

Jump to: navigation, search

This manual was written for developers who want to develop plugins and new features using Eclipse. The starting configuration of new modules still has to be done in Netbeans, but great part of the development (run, debug and browse sources and documentation) can be done using Eclipse.

Contents

Step 1: Create the plugin modules

Unfortunatelly, there is no easy way to create a Netbeans module with Eclipse. So, to start implementing a plugin, we must first create the basic modules with Netbeans.

I will use in this example the modulue plugin from the Pugin Quick Start, available at http://wiki.gephi.org/index.php/Plugin_Quick_Start_(5_minutes) After finishing these steps, also follow the steps to add a submenu, available at http://wiki.gephi.org/index.php/HowTo_add_a_submenu. If you finished these steps, or if you are already implementing a plugin, you are ready to follow the next steps to implement it using Eclipse.

I implemented a submenu with some lines of code, as shown in the following.

package org.myname.myfirstplugin;
 
import java.awt.event.ActionEvent;
import java.awt.event.ActionListener;
 
import org.gephi.graph.api.Graph;
import org.gephi.graph.api.GraphController;
import org.gephi.graph.api.GraphModel;
import org.gephi.project.api.Project;
import org.gephi.project.api.ProjectController;
import org.gephi.project.api.Workspace;
import org.openide.awt.ActionRegistration;
import org.openide.awt.ActionReference;
import org.openide.awt.ActionReferences;
import org.openide.awt.ActionID;
import org.openide.util.Lookup;
import org.openide.util.NbBundle.Messages;
 
@ActionID(category = "Tools",
id = "org.gephi.desktop.recentfiles.SomeAction")
@ActionRegistration(displayName = "#CTL_SomeAction")
@ActionReferences({
    @ActionReference(path = "Menu/Plugins", position = 3333)
})
@Messages("CTL_SomeAction=Some Action")
public final class SomeAction implements ActionListener {
 
    public void actionPerformed(ActionEvent e) {
    	ProjectController projectController = Lookup.getDefault().lookup(ProjectController.class);
    	Project project = projectController.getCurrentProject();
    	Workspace workspace = projectController.getCurrentWorkspace();
 
    	// Get the graph instance
    	GraphController graphController = Lookup.getDefault().lookup(GraphController.class);
    	GraphModel graphModel = graphController.getModel();
    	Graph graph = graphModel.getHierarchicalMixedGraph();
    }
}

In order to compile this Action, you have to add the following module dependencies to your plugin module:

  • Graph API
  • Lookup API
  • Project API


Step 2: Download the Gephi core sources

For easy debugging and source code navigation, you can download the Gephi core sources. Follow the instructions available at http://wiki.gephi.org/index.php/Checkout_Code


Step 3: Install and Run Eclipse

Eclipse is available for different platforms, in packages with different functionalities. The most common Eclipse package is the Eclipse IDE for Java Developers, that can be downloaded at http://www.eclipse.org/downloads/

Download the package for your platform, extract it and run.

Step 4: Open the project with Eclipse

  • Open the menu File > New > Java Project
  • Uncheck "Use default location"
  • In the "Location" text field, browse to your plugin's project path
  • Choose a project name for your Eclipse project, e.g. test_plugin, and use it in the "Project name" text field

Your screen should look like this:

File:Eclipse_SC1.png

You will see the following message in the bottom of the window: "The wizard will automatically configure the JRE and the project layout based on the existing source.". In fact, Eclipse uses the information available in the build.xml script to automatically configure your project.

  • Click next and you will see that everything (sources and libraries) will be automatically configured.
  • Now you can click on Finish, and your project will be imported to Eclipse.

Step 5: Run Gephi with Eclipse

  • Open the menu Run > External Tools > External Tools Configurations
  • Click on "Ant Build" and press the "New launch configuration" button to create a new Ant Build configuration
  • In the "Name" text box, put a name for your configuration, e.g. "run Gephi"
  • In the "Build file" text box, Browse the workspace and select the build.xml script.
  • In the "Browse directory" text box, Browse the workspace and select your project.

Your screen should look like this:

File:Eclipse_SC2.png
  • Go to the tab "Targets" and select the "run" target.

Your screen should look like this:

File:Eclipse_SC3.png
  • Click on "Apply" and "Run".

The Ant script will start to run and Gephi will be started, as if you were on Netbeans.

Step 6: Add a reference to the Gephi core sources

For easy debugging and source code navigation, you can configure your plugin project to refer to the Gephi core sources.

  • First of all, open in Eclipse the Gephi core project you downloaded in step 2.

Follow the instructions of step 4, but using the Gephi core project as project path.

  • When you have imported the Gephi core project in Eclipse, right-click on your plugin project and select "Properties" from the context menu.
  • In the "Java Build Path" window, select the Projects tab and add the Gephi core project. Your screen should look like this:
File:Eclipse_SC4.png
Click OK.
  • Go to the "Order and Export" tab and select the Gephi core project from the list of entries (it should be the last entry).
  • Click in the "Top" button (the entry will go to the top of the list) and check the entry if the ckeckbox is not ckecked. Your screen should look like the next screenshot. Click OK.
File:Eclipse_SC5.png

Now, when you use a class from the Gephi core, you will be able to see the documentation and to browse the core source code when ctrl+clicking classes and method names.

Step 7: Debugging with Eclipse

At this point, you are ready to configure your project for debugging with Eclipse. We will use the Java Debug Wire Protocol (JDWP) in Eclipse, the same protocol used for debugging in Netbeans. JDWP is the protocol used for communication between a debugger and the Java virtual machine (JVM) which it debugs. It can work in two ways: 1) the JVM connects to the debugger or 2) the debugger connects to the JVM. We will configure Eclipse to work in the first way: First, we configure a debugging server and after we will start a JVM that will connect to the debugger.

  • The first step is to change the harness/run.xml script in order to support Eclipse debugging.

Apply the patch available in the following url: https://github.com/panisson/gephi-plugins/commit/863b4bd00a890bccfbad73a7dc8fbf07dc940c1b

  • The second step is to add a debugger configuration.

Go to the menu Run > Debug Configurations... to open the Debug Configurations window. Select "Remote Java Application" and press the "New launch configuration" button. Choose a name for your configuration (e.g. plugin debugger) and in the Project text box, browse to select your plugin project. In the "Connection type" dropbox, select "Standard (Socket Listen)". Put the port 8000 in the Connection properties, apply and start the server by clicking "Debug". see the screenshot 6.

File:Eclipse_SC6.png
  • The third step is to start Gephi in debug mode.

Open again the Ant script configuration by going to Run > External Tools > External Tools Configurations. Select the configuration created at step 5. Go to the tab Targets, deselect the 'run' target and select the 'debug' target. To configure the port where the JVM will connect, go to the tab "Properties" and uncheck "Use global properties ...". Click on "Add Property" and add a property with name "debug.port" and value 8000.

You can try the debugging facilities by adding a breakpoint in the actionPerformed method of the SomeAction class. When you go to Gephi in the menu Plugins > Some Action, the execution will be suspended in the breakpoint you added. You can add a breakpoint in any of the Gephi core classes, and the breakpoint will work as well.

Personal tools